Pokazywanie postów oznaczonych etykietą Mixed Media Place. Pokaż wszystkie posty

wtorek, 10 grudnia 2013

'Inspiruj odważnie' - z płytkami / 'Inspire with courage' - with art tiles

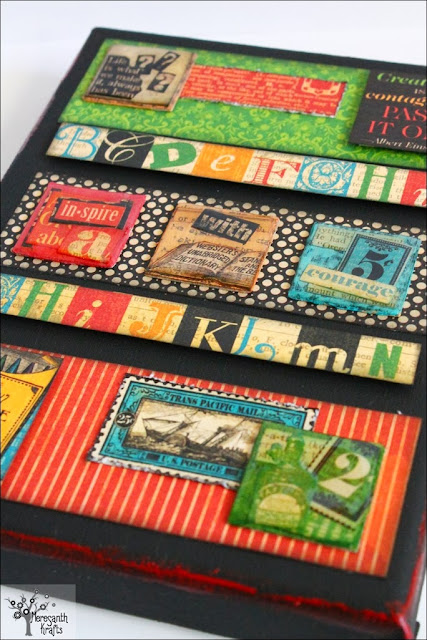
Wyzwanie w Mixed Media Place skłoniło mnie do powrotu do zabawy w tworzenie płytek z użyciem Glossy Accents. Poniżej praca, która powstała na blejtramie z elementami papierów G45 'Typography' i płytkami, a dalej krok po kroku proces tworzenia płytek.

The Mixed Media Place challenge made me go back to making art tiles with Glossy Accents. Below is the project that resulted, using elements of G45 'Typography' papers and the art tiles, and then the process of making them step by step.


Jako baza do płytek może posłużyć tektura - ja wycinam kwadraty wielkości ok. 2cm. Do dekoracji płytek świetnie nadają się ścinki papierów pozostałe po innych projektach.
Any sort of chipboard can work as the base for the art tiles - I punch out 2cm squares. To embellish them, you can use paper scraps and leftovers from past projects.


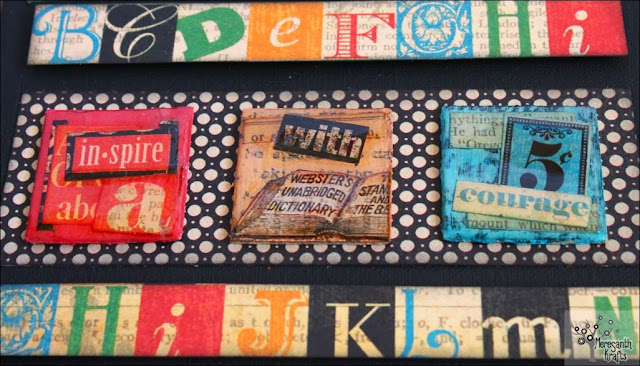
Najpierw przyda się jakieś tło - płytki można malować farbami, tuzować, stemplować. Następnie planujemy rozłożenie elementów papierowych na płytkach.
First some background - you can paint over the tiles, ink them, stamp them. Then plan how you want to use the paper elements on them.

I przyklejamy. / And glue them.

Następnie pokrywamy wszystko sporą warstwą Mod Podge's albo innego preparatu, który zaimpregnuje całość.
Then cover everything with a generous amount of Mod Podge or anything else that will seal all the elements.

I w końcu - pokrywamy płytki Glossy (lub Crackle) Accents i zostawiamy do wyschnięcia (ja zazwyczaj zostawiam do wyschnięcia na noc i siadam do projektu z nimi następnego dnia).
Finally - cover the art tiles with Glossy (or Crackle) Accents and left to dry (I usually leave them overnight and make the project the next day.) 


środa, 26 czerwca 2013

Distress Inks, my love :)

W Distressach zakochałam się od pierwszego wejrzenia. Co więcej, od tamtej pory nie przestają mnie zaskakiwać swoimi możliwościami, różnorodnością sposobów, na które można je wykorzystać i tym jak "same z siebie" potrafią "zrobić całą pracę".

With Distress Inks, it was love at first sight for me. What's more, since then, they have been surprising me constantly with new possibilities of application, the variety of ways in which they can be used and the way they can be the sole pillar of a great project.

Na wyzwanie "Jak TY używasz tuszy Distress" w Mixed Media Place przygotowałam pracę, która jest właśnie prawie wyłącznie Distressowa, z minimalną ilością innych elementów. Praca posłuży jako okładka albumu. Użyte kolory to Seedless Preserves, Mowed Lawn i Mustard Seed.

I decided to enter the 'How you use Distress Inks' challenge at Mixed Media Place with a project that is very Distress-based, with a minimum of other elements. This project is probably going to be an album cover. The colours I used are Seedless Preserves, Mowed Lawn and Mustard Seed.

Tło i frontowe koło zrobiłam "stemplując" tuszami na macie craftowej, dodając wody i potem przesuwając po tym biały karton, zbierając nim kolor. Brzegi prostokąta podkreśliłam używając bezpośrednio poduszeczki tuszu, żeby otrzymać silny kolor i nieregularnie, a wyraźnie pobrudzić, a brzegi koła potraktowałam za pomocą aplikatora.

Elementy z kółkami to wynik stemplowania za pomocą pianki, na której wycisnęłam kółka za pomocą zakrętki od kleju. Piankę posmarowałam trzema kolorami tuszy tu i tam i odbiłam, znów na białym papierze.

Wierzchnie tło to wynik mojego ostatniego ulubionego odkrycia - kolorowania bezpośrednio poduszką tuszu. Najpierw pokryłam całość żółtym tuszem, a potem "posmerałam" tylko lekko poduszką tuszu zielonego i fioletowego. Strasznie mi się podobają te nieregularne maźnięcia, które się w ten sposób pojawiają. Tekturka i napis też pokolorowane Distressami: tekturka - aplikatorem, napis - bespośrednio poduszkami tuszy.

The background and the circle at the front are made by 'stamping' my ink pads on a craft sheet, adding water and smearing some white cardstock over it, gathering the colour. I coloured the edges of the rectangle with the ink pad itself to get a saturated colour and get the edges kind of 'dirty'. I used the blending tool on the edge of the circle.

The two pieces with circles on them are the result of stamping using a piece of foam on which I first 'embossed' some circles using my glue cap. I inked the foam with three different colours and stamped this on to white cardstock.

The 'fornt background' is a result of my recent discovery - inking paper with the ink pad itself. First I covered everything in yellow, then lightly smeared the green and the volet over it. I really like the irregularity of pattern. Finally I distressed the chipboard piece and the 'memories'.