Pokazywanie postów oznaczonych etykietą Adirondack. Pokaż wszystkie posty

wtorek, 26 kwietnia 2016

Łyżka koloru / A spoonful of colour

Niedawno przypomniało mi się jak bardzo lubię tusze alkoholowe. Bardzo lubię w nich to, że potrafią nadać kolor wszystkiemu, a efekty, jakie tworzą na metalu zawsze sprawiają mi ogromną przyjemność. :) Tym razem za ich pomocą pokolorowałam kompozycję na blejtramie.

I have recently remembered how much I enjoy working with alcohol inks. I really like how they will hold onto any surface and the effects they make on metal always give me lots of pleasure. :) This time I used alcohol inks on a canvas composition.


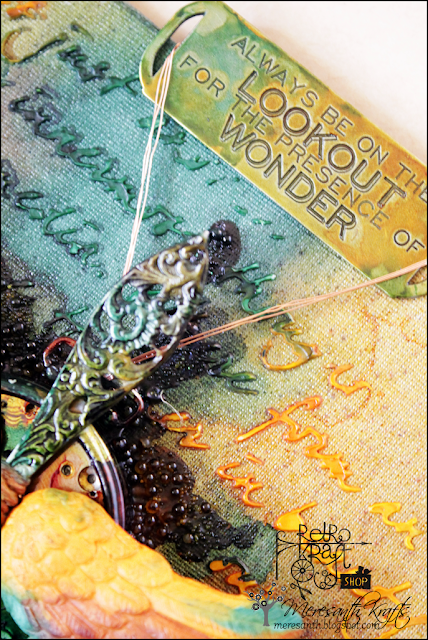
Tło powstało za pomocą maski i gęstej pasty modelującej Maimeri, a na tle znalazła się kompozycja z dużego mechanizmu zegarowego, starej ozdobnej łyżeczki i skrzydeł.

The background was created using a stencil and heavy modeling paste by Maimeri, and on it I arranged a composition from a big pocket watch mechanism, an old decorative spoon and wings.


Wszystkie elementy pokolorowałam tuszami alkoholowymi w tylko trzech kolorach (Rust, Butterscotch, Bottle) - nakładanie ich jednocześnie lub jednego na drugi po wyschnięciu stworzyło wrażenie, że kolorów jest znacznie więcej. No i, ach, te zacieki na łyżeczce... :)

I coloured all the elements using only three alcohol inks (Rust, Butterscotch, Bottle) - applying them at the same time or one on top of another after drying created the illusion that many more colours have been used. And, oh, the staining on the spoon... :)


Kompozycję opatrzyłam tabliczką z najnowszego zestawu Tima Holtza - również podkolorowaną tuszami.
I added a quote band from the new Tim Holtz set to the composition - also colouring it with the inks a little.


Tusz alkoholowy Adirondack Alcohol Ink - Rust Tusz alkoholowy Adirondack Alcohol Ink - Butterscotch Tusz alkoholowy Adirondack Alcohol Ink - Bottle

Gęsta pasta modelująca - Maimeri Acrilico 200ml Gęsty żel matowy - Maimeri Acrilico 200ml Quote Bands - Tim Holtz Idea-ology

Szablon 6x6 - Art is - Crafter's Workshop Paper Clay - Prima


piątek, 14 lutego 2014

Tylko dla siebie / Just for myself

W końcu znalazłam chwilę, żeby zrobić coś tylko dla siebie. Wróciłam do tuszy alkoholowych i testowałam swoją nową miłość - Inkę Gold - na konto umiejętności imitowania metalowej płytki. Muszę powiedzieć, że całkiem nieźle jej poszło. :)

At last I found a moment to do something just for myself. Came back to alcohol inks and tested my new love - Inka Gold - on account of the ability to imitate a metal sheet. Have to say, she did pretty well. :)


niedziela, 24 listopada 2013

Zabawa z tuszami alkoholowymi

Usiadłam dziś do tuszy alkoholowych i w pierwszej kolejności postanowiłam wypróbować je na przezroczystym plastiku - użyłam pociętych okładek do bindowania dokumentów. Sam z siebie pokolorowany plastik żadną rewelacją nie jest, postanowiłam więc użyć maski i czarnej farby, tak, żeby moje 'alkoholowe tło' zostało widoczne tylko częściowo. Podkleiłam kartką ze starej pożółkłej książki i... bardzo mi się to podoba. :)

I experimented with alcohol inks today and decided to first try them out on acetate - I used pieces of sheets used as covers for binding documents. The inked up plastic itself is not a revelation, so I decided to use a mask and black paint so that my 'alcohol background' was only party visible. I backed everything up on an old book page and... I quite like the result. :)


A tu etap po etapie podczas tworzenia kolej wersji kolorystycznej.
And here it is step by step as I was making another colour variation.

Potrzebujemy: przezroczystego arkusza plastiku (może być np. resztka jakiegoś opakowania), tuszy alkoholowych, szablonu lub maski, farby akrylowej (ja użyłam czarnej), tła do podklejenia (np. kartki ze starej ksiażki).
We need: acetate (transparent plastic sheet, could be could be a part of old packaging), alcohol inks, a stencil or a mask, acrylic paint (I used black), something to back it up on (e.g. an old book page).


Tusze można nakładać na różne sposoby, ja użyłam aplikotora Rangera (tego samego, co do Distressów), zmieniając gąbkę na kawałek filcu (wcale żadnego markowego, akurat miałam jakąś żółtą resztkę :) ).
The inks can be applied in many ways, but I used my Ranger applicator (the same one I use for Distress Inks), exchanging the foam for a piece of felt (not a brand name piece of felt, just some yellow remains of something I had :) ).


Tusze są bardzo wydajne, dajemy więc na filc tylko kilka kropel.
You don't need much of the ink to have a good effect, so we add just a few drops on to the felt.


Ważny jest ruch aplikatora - jeżeli będziemy nim kręcić (tak jak tworząc tło tuszami Distress), kolory się zmieszają i powstanie brudna breja (tak, tak, sprawdziłam to ;) ). Trzeba więc jakby 'stemplować', podnosząc i opuszczając aplikator. Powstaje takie coś.
The imporant part is the movement of the applicator - if we move it around like when creating a backgroud with Distress Inks, the colours will blend, resulting in a dirty mush (yeah, I checked ;) ). The inks needs to be 'stamped on', with the applicator moving up and down. The result will be something like this.


Na tym etapie ten, kto był wystarczająco ogarnięty, by do tuszy dokupić Blending Solution może popracować jeszcze nim właśnie, żeby kolory się bardziej połączyły. Ja nie mam, więc lecę dalej. :)
At this stage, those clever enough to have purchased the Blending Solution can work with it to make the colours blend more. I wasn't, so I proceed with what I have. :)

Nakładamy maskę. Nie wiem dlaczego, ale mi bardziej podoba się odwrotna strona mojego tła - nie ta, na którą nanosiłam tusze, tylko ta druga, więc po tej odwrotnej stronie kładę maskę.
Now we will use the mask. I don't know why exactly but I preferred the reverse side of my acetate sheet - not the one I applied the inks to but the other one. So I put my mask on this side.


I nakładam czarną farbę akrylową. Wcześniej zrobiłam to pędzlem, zostawiając ślady pociągnięć, tym razem wypróbowałam gąbkowy aplikator.
And here goes the black acrylic paint. With the first piece I made I used a brush, leaving some visible brush strokes, so this time I experimented with a sponge applicator.


Zdejmujemy maskę, suszymy i mamy.
Remove the mask, dry and there you are.


I ostatni etap - mocnym klejem do wszystkiego podlejamy nasze tło i odcinamy nadmiar.
The last stage - use strong all purpose glue to back the acetate up on whatever paper you like. Cut around to remove the excess.


I oto efekt. Fajna baza do kartki albo może zaczątek jakiejś okładki...
And here is the final result. A cool card base or maybe the beginning of a cover for something...


A tu jeszcze próby bawienia się tuszami i Archivalem - który nie trzyma się plastiku, tak więc znów odwróciłam całość i stemplowanie wylądowało pod spodem, przyklejone do tła - kartki ze starej książki do matematyki.
And here some attempts at stamping the inked acetate with Archival Ink - which does not hold on to plastic, so I turned the stamped side around and adhered the backing to it (a page from an old math book this time).


sobota, 23 listopada 2013

Nowe media / Mixed media haul


Tak jak do tej pory stroniłam od wszelkiej maści brokatów, tak przed Distress Glitter nie mogłam się powstrzymać. Zaraz siadam do roboty z nimi. :)
I have so far shunned all sort of glitter, but I could not resist Distress Glitter. Going to be making something with them in a moment. :)


No i w końcu będę miała czym mazać swój kochany metal, a i na szkle muszę popróbować, bo oto przybył mały zestaw Adirondacków.
And finally I'll have something to smear over my beloved metal and will be trying something with glass as well, as a small set of Adirondacks have just arrived.